Guide to Staking on Ethereum (Ubuntu/Lighthouse)

Last updated: 19-August-2024
This is a step-by-step guide to staking on the Ethereum mainnet via an Execution Client and the Lighthouse Consensus Client. It is based on the following technologies:
- Server: Ubuntu v22.04 (LTS) x64
- Execution Client: Besu / Erigon / Geth / Nethermind / Reth
- Consensus Client: Sigma Prime Lighthouse
- Crypto wallet: MetaMask
Warnings
Staking requires a deposit of 32 ETH + gas fees. This guide includes instructions to safely deposit your ETH for staking on the Ethereum mainnet using official methods. DO NOT send ETH anywhere without knowing what you are doing.
Disclaimer
This article (the guide) is for informational purposes only and does not constitute professional advice. The author does not guarantee accuracy of the information in this article and the author is not responsible for any damages or losses incurred by following this article. A full disclaimer can be found at the bottom of this page — please read it before continuing.
Table of Contents
Acknowledgements
Support
Prerequisites
Testnet to Mainnet
Requirements
Activation Queue
Overview
Step 1 — Generate Staking Data
Step 2 — Create the Server User
Step 3 — Update the Server
Step 4 — Secure the Server
Step 5 — Create a Swap Space
Step 6 — Configure Timekeeping
Step 7 — Generate Client Authentication Secret
Step 8 — Configure the Execution Client
- Install the Execution Client — Besu
- Install the Execution Client — Erigon
- Install the Execution Client — Geth
- Install the Execution Client — Nethermind
- Install the Execution Client — Reth
Step 9 — Install the Lighthouse Consensus Client
Step 10 — Import the Validator Keys
Step 11 — Configure the Beacon Node Service
Step 12 — Configure the Validator Service
Step 13 — Fund the Validator Keys
Final Remarks and Recommended Next Steps
Further Reading
Appendix A — Updating Besu
Appendix B — Updating Erigon
Appendix C — Updating Geth
Appendix D — Updating Nethermind
Appendix E — Updating Reth
Appendix F — Updating Lighthouse
Appendix G — Adding Validators
Appendix H — Exiting Validators
Appendix I — Manage Systemd Journal Logs
Appendix J — Expanding the Logical Volume
Full Disclaimer
Acknowledgements
Thanks to the EthStaker Admins and Educators, the Ethereum Execution and Consensus Client teams, the Ethereum core developers and researchers, and the Ethereum staking community for all of their amazing contributions, feedback, and support.
Support
For technical support reach out to:
- The EthStaker community on Reddit or Discord. Knowledgeable and friendly community passionate about staking on Ethereum.
- The Lighthouse Consensus Client team Discord.
- The Besu / Erigon / Geth / Nethermind Execution Client team Discord.
- The Reth Execution Client team Telegram.
Prerequisites
This guide assumes some knowledge of Ethereum, ETH, staking ETH, Linux, and MetaMask.
This guide also requires the following before getting started:
- Ubuntu server v22.04 (LTS) amd64 installed and running on a local computer or in the cloud. A locally running computer is encouraged for greater decentralization.
- MetaMask crypto wallet web browser extension installed and configured on a computer with a desktop (Mac, Windows, Linux, etc.) and a web browser (Brave, Safari, FireFox, etc.).
Testnet to Mainnet
If moving from a testnet setup to a mainnet setup it is strongly recommended that you start on fresh (newly installed) server instance. This guide has not been tested for migration scenarios and does not guarantee success if you are using an existing server instance with previously installed testnet software.
Requirements
In general the following are required for good staking performance. More information here and here.
- A relatively modern multi-core CPU.
- 16GB RAM (32GB is better, and required in some cases).
- An SSD (NVMe is better) of at least 2TB.
- A stable internet connection with sufficient download speed and monthly data allowance.
Activation Queue
As demand grows for staking, the queue to register new validators increases. Based on various factors, the Ethereum PoS network allows a fixed number validators to join per day. Depending on demand it might be mins, hours, days, weeks, or even months until your deposit becomes active and eligible for validation duties. This means once you queue your validator to join the network (by depositing your 32 ETH) it won’t be eligible to participate in staking or to earn staking rewards until it has activated.
The pending validators queue can be observed here.

Estimated queue times can be viewed here.
NOTE: As stated at the beginning of this guide, DO NOT deposit your ETH without understanding what you are doing. DO NOT send your ETH to the Ethereum deposit contract without following the instructions in this guide.
Overview
The simplified diagram below illustrates the staking setup. The yellow boxes are the areas this guide covers.

The Consensus Client (formerly Eth2 client) is the software that provides the PoS consensus mechanism to the Execution Client. It includes the Beacon Chain Node and the Validator.
The Execution Client (formerly Eth1 client) is the software that is responsible for various Ethereum network operations such as selecting/executing transactions from the mempool.
NOTE: Both the Execution Client and the Consensus Client are required to stake.
The conceptual flow through the guide is:
- Generate the staking Deposit Data and Validator Keystore(s)
- Prepare the Ubuntu Server (updates, firewall, security, etc.)
- Set up an Execution Client node and sync it with the Ethereum mainnet
- Set up the Lighthouse Consensus Client and sync with other Beacon Nodes
- Deposit 32 ETH to activate the staking Validator(s)
Let’s get started!
Step 1 — Generate Staking Data
In order to participate in staking it is necessary to use a tool to generate data files based on the number of validators you’d like to fund and operate.
NOTE: If you have already generated your staking Deposit Data and Validator Key(s) you can skip this step.
Each validator will require a deposit of 32 ETH in order to activate it on the Ethereum mainnet. You should have sufficient ETH in your MetaMask wallet to fund each validator. For example if you plan to run 2 validators you will need to have (32 x 2) = 64 ETH plus some extra to cover the gas fees. The ETH deposit will happen later in the guide after everything else is up and running.
Download the Deposit Tool (Staking Deposit CLI)
The Staking Deposit CLI is a stand-alone tool that can be run on either Windows or Linux. Besides staking data files, it generates a mnemonic which is sensitive, so there are some security best practices discussed below.
Go here to get the Latest version of the Staking Deposit CLI (command line interface) tool.

In the Assets section locate the version matching the required platform. If Windows, right-click the link and download. If Linux, download the archive using the commands below.
Modify the URL below to match the download link for the latest version.
$ cd ~
$ curl -LO https://github.com/ethereum/staking-deposit-cli/releases/download/v2.7.0/staking_deposit-cli-fdab65d-linux-amd64.tar.gz
If on Windows, unzip the archive and go into the folder created. If on Linux, unpack the tar archive using the commands below and go into the directory after renaming it.
Modify the file name to match the downloaded version.
$ tar xvf staking_deposit-cli-fdab65d-linux-amd64.tar.gz
$ mv staking_deposit-cli-fdab65d-linux-amd64 staking-deposit-cli
$ rm staking_deposit-cli-fdab65d-linux-amd64.tar.gz # <-- Clean up
$ cd staking-deposit-cli
There should be a binary file (executable) in the archive named deposit.

Prepare to Run the Deposit Tool (Staking Deposit CLI)
The Staking Deposit CLI tool generates a mnemonic key. It is used to generate the staking data and (eventually) the withdrawal key(s) as well. This mnemonic must be handled securely to avoid any risk of it being exposed. There are different ways to proceed; two options are provided below.
Option 1: Air-Gapped Machine (recommended) — Copy the deposit binary file to a USB drive. Connect the drive to a fully air-gapped machine (never previously connected to a network or the internet) and copy the binary file to the air-gapped machine.
Option 2: Current Machine (not recommended) — Run from the current machine. An internet connection may be an opportunity to leak your mnemonic key. If a fully air-gapped machine isn’t available, disconnect the network/internet on the current machine before proceeding.
Run the Deposit Tool (Staking Deposit CLI)
On the secure machine run the binary file in a terminal window (or CMD in Windows). For example, if you want to create 2 validators use the commands below.
On Linux:
$ sudo ./deposit new-mnemonic --num_validators 2 --chain mainnet --eth1_withdrawal_address <YourWithdrawalAaddress>On Windows:
deposit.exe new-mnemonic --num_validators 2 --chain mainnet --eth1_withdrawal_address <YourWithdrawalAaddress>Replace <YourWithdrawalAddress> with an Ethereum address within your control.
NOTE: Once set, the withdrawal address CANNOT be changed, so be ABSOLUTELY SURE that it is an address within your control and correctly specified. For example:
--eth1_withdrawal_address 0xd8dA6BF26964aF9D7eEd9e03E53415D37aA96045NOTE: The flag
--eth1_withdrawal_addressallows you to specify an Ethereum address that your staking rewards in excess of 32 staked ETH will automatically be withdrawn to (once withdrawals are enabled). This will also be the address your 32 ETH will be withdrawn to if you exit the validator. More information here.NOTE: If you don’t set the
--eth1_withdrawal_addressflag at this time, you can set it later via a special process (known as converting the withdrawal credential from0x00to0x01) when you are ready to start withdrawing the staking rewards or when you want to exit the validator. If you don’t set the flag, staking rewards in excess of 32 ETH will not be automatically withdrawn and you will not be able to reclaim the 32 ETH deposit upon exiting the validator until you convert the withdrawal credential.
Once you execute the above steps on your platform of choice, confirm your withdrawal address, and provide your language preferences you will be asked to create the validator keystore(s) password. Back it up somewhere safe. You will need this later to import the validator(s) into the Consensus Client.
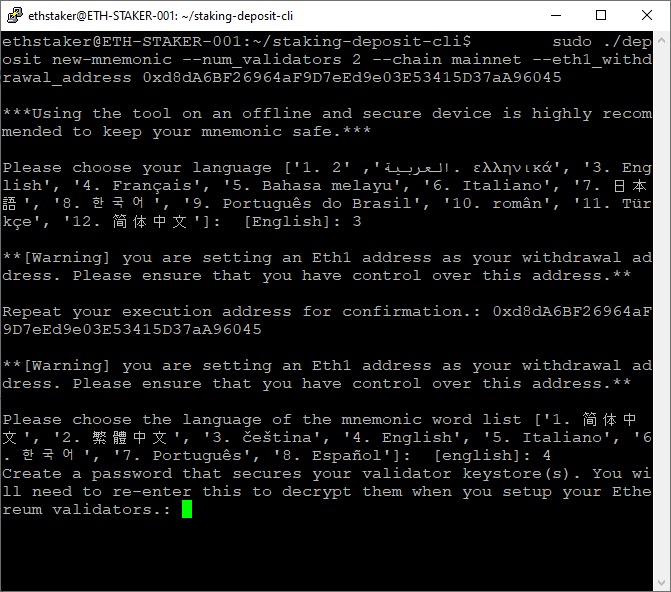
Next, a seed phrase (mnemonic) will be generated. Back it up somewhere safe. This is CRITICAL. You will eventually use this to generate your withdrawal keys for your staked ETH or to add additional validators.
NOTE: If you lose the mnemonic you will not be able to withdraw your funds.

Once you have confirmed your mnemonic your validator(s) will be created.

The validator(s) and deposit data file are created at the specified location. The contents of the directory are shown below.

Notes on the files:
- The
deposit_data-[timestamp].jsonfile contains the public key(s) for the validator(s) and information about the staking deposit. This file will be used to complete the ETH staking deposit process later in this guide. - The
keystore-[..].jsonfiles contain the encrypted validator signing key. There is one keystore file per validator that you are funding. These will be imported into the Consensus Client for use during validation operations. - You will copy the files over to your Ubuntu server (if not already there) later in this guide.
- If you lose or accidentally delete the files it is possible to regenerate them using the Staking Deposit CLI tool and your mnemonic via the
existing-mnemoniccommand. More information here.
Final Steps
Now that you have generated the deposit data, keystore file(s), validator password, and the mnemonic move on to set up the Ubuntu server.
DO NOT DEPOSIT any ETH at this moment.
It is important to complete and verify your staking setup first. If your ETH deposits become active and your staking setup is not ready, inactivity penalties will be deducted from your staked ETH balance.
Step 2 — Create the Server User
Using a SSH client, connect to your Ubuntu server. If you are logged in as root (usually denoted in this format: root@YourServerName:~#) then create a user-level account with admin privileges instead, since logging in as the root user is risky.
NOTE: If you are not logged in as
root(usually denoted in this format:YourUserName@YourServerName:~$) then skip this and go to Step 3.
Create a new user. Replace <yourusername> with a username of your choice. You will asked to create a strong password and provide some other optional information.
# adduser <yourusername>Grant admin rights to the new user by adding it to the sudo group. This will allow the user to perform actions with superuser privileges by typing sudo before commands.
# usermod -aG sudo <yourusername>OPTIONAL: If you used SSH keys to connect to your Ubuntu instance via the root user you will need to associate the new user with the root user’s SSH key data.
# rsync --archive --chown=<yourusername>:<yourusername> ~/.ssh /home/<yourusername>Finally, log out of root and log in as <yourusername>.
Step 3 — Update the Server
Make sure the system is up to date with the latest software and security updates.
$ sudo apt -y update && sudo apt -y upgrade
$ sudo apt dist-upgrade && sudo apt autoremove
$ sudo reboot
Step 4 — Secure the Server
Security is important. This is not a comprehensive security guide, just some basic settings.
Modify the Default SSH Port
Port 22 is the default SSH port and a common attack vector. Change the SSH port to avoid this.
Choose a port number between 1024–49151 and run the following command to check is not already in use.
$ sudo ss -tulpn | grep ':YourSSHPortNumber'Example:
$ sudo ss -tulpn | grep ':6673'A blank response indicates not in use, a red text response indicates it is in use: try a different port.
If confirmed available, modify the default SSH port number by updating your server’s SSH config. Open the config file:
$ sudo nano /etc/ssh/sshd_configFind or add (if not present) the line Port 22 in the file. Remove the # (if present) and change the value as below.
Port <YourSSHPortNumber>Check the screen shot below for reference.

Press <CTRL> + X then Y then <ENTER> to save and exit.
Restart the SSH service to reflect the changes.
$ sudo systemctl restart sshRemember to update your SSH client settings to reflect the new SSH port that you configured. Log out and log back in via SSH using YourSSHPortNumber as the port number to make sure everything is working correctly.
Configure the Firewall
Ubuntu 22.04 servers can use the UFW firewall to restrict inbound traffic to the server. The firewall helps prevent unwanted connections to your server.
Install UFW
UFW should be installed by default. The following command will ensure it is.
$ sudo apt install ufwApply UFW Defaults
Explicitly apply the defaults: inbound traffic denied, outbound traffic allowed.
$ sudo ufw default deny incoming
$ sudo ufw default allow outgoing
Allow SSH
Allow inbound traffic on YourSSHPortNumber as set above. SSH requires the TCP protocol.
NOTE: If you are hosting your Ubuntu instance locally and would like to access your server remotely (not recommended for security reasons), your internet router may need to be configured to allow incoming traffic on port
YourSSHPortNumberas well.
$ sudo ufw allow YourSSHPortNumber/tcpExample:
$ sudo ufw allow 6673/tcpDeny SSH Port 22
If you have changed the value of the SSH port then deny inbound traffic on the default port 22/TCP.
$ sudo ufw deny 22/tcpAllow Execution Client Port 30303
Allow P2P connections with Execution Client peers (port 30303). This is a common port used by all of the Execution Clients described in this guide.
NOTE: If you are hosting your Ubuntu instance locally your internet router may need to be configured to allow incoming traffic on port 30303 as well.
$ sudo ufw allow 30303Allow Lighthouse
Allows P2P connections with Consensus Client peers for actions on the Beacon Chain Node (port 9000).
NOTE: If you are hosting your Ubuntu instance locally your internet router may need to be configured to allow incoming traffic on port 9000 as well.
$ sudo ufw allow 9000If Quic Support for faster networking with other Lighthouse clients is desired also enable port 9001/UDP.
NOTE: If you are hosting your Ubuntu instance locally your internet router may need to be configured to allow incoming traffic on UDP port 9001 as well.
$ sudo ufw allow 9001/udpEnable the Firewall
Enable the firewall and verify the rules have been correctly configured.
$ sudo ufw enable
$ sudo ufw status numbered
Check the screen shot below for reference.
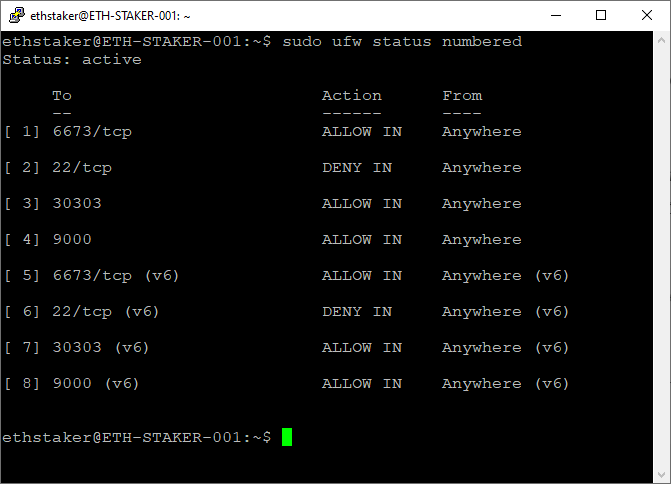
Log out and SSH back in again to confirm everything is working correctly.
Step 5 — Create a Swap Space
A swap space (a file on the disk used to store in-memory data when the system memory gets low) is used to guard against out-of-memory errors, at the cost of some disk space. It is particularly useful for clients that require large amounts of memory when syncing or running. More information here.
NOTE: This step should be considered optional. Disk space is at a premium and while having the swap can be useful, it comes at the cost of multiple gigabytes of storage. The advantage is that it may prevent out of memory (OOM) incidents, especially if using the Erigon Execution Client.
Confirm there is no swap space already configured.
$ free -hZeros on the Swap: row indicate there is no swap space assigned.
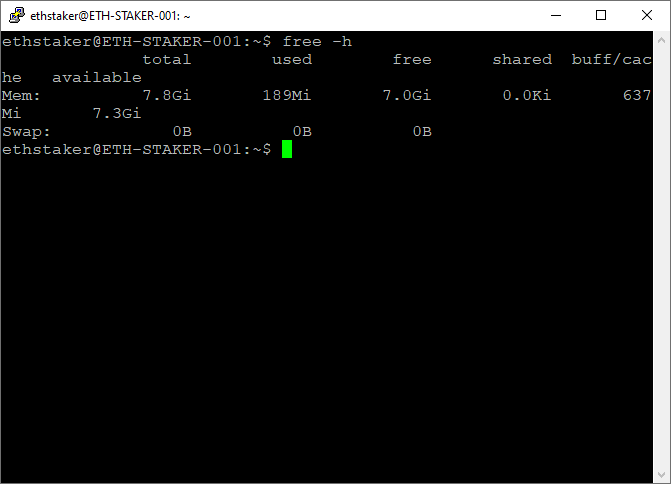
NOTE: If you already have swap space assigned you can skip this step.
The recommended swap space size on disk is shown below. If you have 8GB RAM then use a swap space size of 3GB.
RAM     Swap Size
  8GB           3GB
 12GB           3GB
 16GB           4GB
 24GB           5GB
 32GB           6GB
 64GB           8GB
128GB          11GB
Check for available disk space.
$ df -hIn the Mounted on column locate the row with /. The swap file will be created on that disk. Make sure it has sufficient space available.
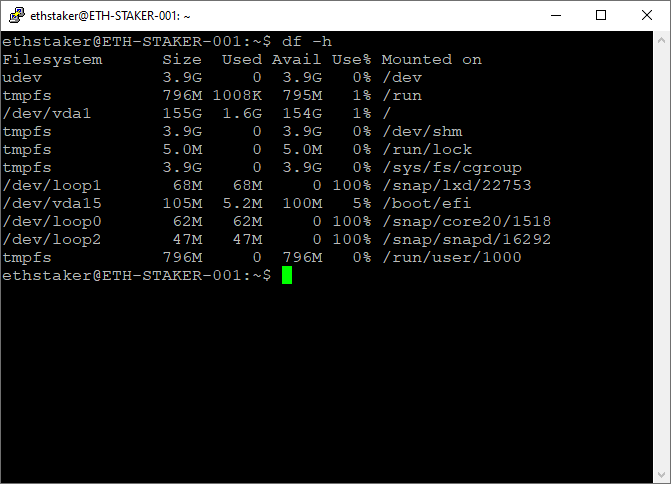
Create the swap space. The value 3G (3GB) below is for a server with 8GB RAM. Change the value based on the size you require. E.g. If your server has 16GB RAM, then use 4G.
$ sudo fallocate -l 3G /swapfile
$ sudo chmod 600 /swapfile
$ sudo mkswap /swapfile
$ sudo swapon /swapfile
Verify the changes.
$ free -hThe swap space should now show.
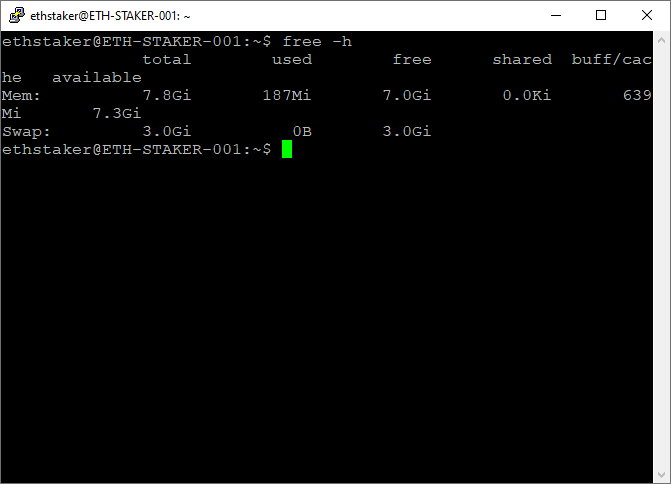
Enable the swap space to persist after reboot.
$ sudo cp /etc/fstab /etc/fstab.bak
$ echo '/swapfile none swap sw 0 0' | sudo tee -a /etc/fstab
Configure the swap space.
$ sudo sysctl vm.swappiness=10
$ sudo sysctl vm.vfs_cache_pressure=50
Open the config file to configure the swap space.
$ sudo nano /etc/sysctl.confAdd the following to the end of the file.
vm.swappiness=10
vm.vfs_cache_pressure=50
Check the screenshot below for reference.

Press <CTRL> + X then Y then <ENTER> to save and exit.
The swap file is now configured. Monitor using the htop command.

Press <CTRL> + C to exit.
Step 6 — Configure Timekeeping
Running validators against a blockchain requires accurate timekeeping in order to ensure proper synchronization with the blockchain network. Ubuntu has time synchronization built in and activated by default using the timedatectl systemd directive.
Verify it’s running correctly.
$ timedatectlCheck the screenshot below for reference.
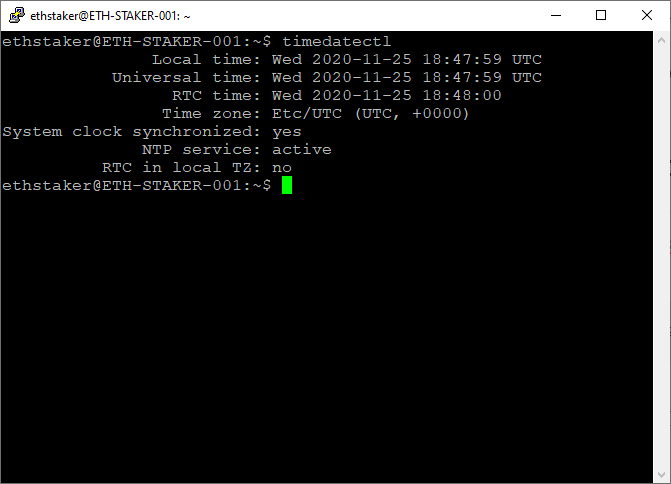
The NTP service should be active. If not then run:
$ sudo timedatectl set-ntp onStep 7 — Generate Client Authentication Secret
On the server, communication between the Execution and Consensus clients is secured using a JSON Web Token (JWT) authentication scheme. The JWT is represented by a file that contains a randomly generated 32-byte hex string. The Execution and Consensus clients each make use of the file for message authentication. More information here.
Create a directory on the server to store the JWT file.
$ sudo mkdir -p /var/lib/jwtsecretGenerate the JWT file using the openssl cryptography software library.
$ openssl rand -hex 32 | sudo tee /var/lib/jwtsecret/jwt.hex > /dev/nullUse the following command to inspect the file with the hex string.
$ sudo nano /var/lib/jwtsecret/jwt.hex
Press <CTRL>+X to exit.
Later in the guide, the path to the jwt.hex file will be included in the configuration of the Execution and Consensus clients so they can authenticate incoming and outgoing messages.
Step 8 — Configure the Execution Client
An Execution Client is required for staking. This guide includes instructions for installing each of the five main Execution Clients. They are:
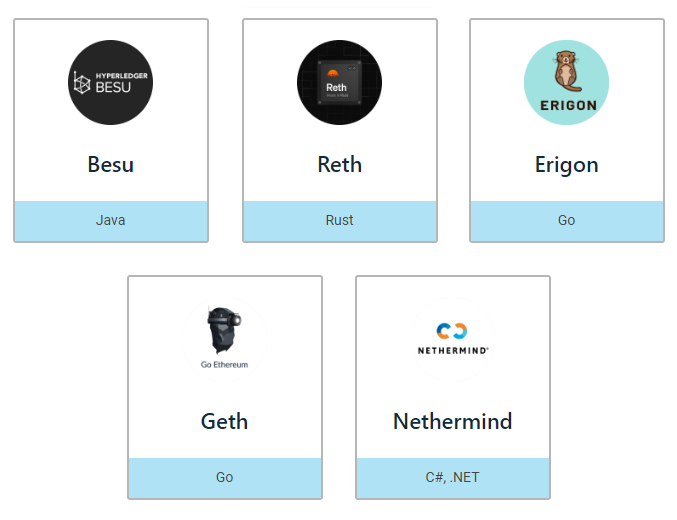
Each client has different characteristics. More information here.
NOTE: It is only necessary to install and run ONE Execution Client from the five options above.
The client you choose is up to you, however, it is recommended in the interests of client diversity (and to avoid serious penalties if using a majority client which experiences a broadly impacting bug) that you select a minority client. Check here to determine the current distribution. For example, at the time the screenshot was taken below, Geth was the majority Execution Client so you should consider a different option.

The following instructions detail installation steps for each of the five Execution Clients. Remember: it is only necessary to install one. Skip past the other sections as necessary.
NOTE: Check your available disk space (e.g. using
df -h). A fully synced Execution Client database currently requires just under 1.2 TB of space. Even if you have a large SSD there are cases where Ubuntu reports only 200GB free. If this applies to you then refer to Appendix J — Expanding the Logical Volume.

Install the Execution Client — Besu
Install the Hyperledger Besu (or simply Besu) Execution Client by downloading the latest version.
Go here to get the Latest release of Besu.

In the Assets section copy the download link to the tar.gz file. Be sure to copy the correct link.
Download the archive using the commands below. Modify the URL to match the download link for the latest version.
$ cd ~
$ curl -LO https://github.com/hyperledger/besu/releases/download/24.5.4/besu-24.5.4.tar.gz
Extract the files from the archive and copy to the /usr/local/bin directory. The Besu service will run it from there. Modify the file name to match the downloaded version.
$ tar xvf besu-24.5.4.tar.gz
$ sudo cp -a besu-24.5.4 /usr/local/bin/besu
Clean up the files. Modify the file name to match the downloaded version.
$ rm besu-24.5.4.tar.gz
$ rm -r besu-24.5.4
Install the required prerequisites.
$ sudo apt -y install openjdk-21-jre-headless
$ sudo apt install -y libjemalloc-dev
Besu will be configured to run as a background service. Create an account for the service to run under. This type of account can’t log into the server.
$ sudo useradd --no-create-home --shell /bin/false besuCreate the data directory. This is required for storing the Ethereum blockchain data.
$ sudo mkdir -p /var/lib/besuSet directory permissions. The besu user account needs permission to modify the data directory.
$ sudo chown -R besu:besu /var/lib/besuCreate a systemd service config file to configure the service.
$ sudo nano /etc/systemd/system/besu.servicePaste the following service configuration into the file.
[Unit]
Description=Besu Execution Client (Mainnet)
Wants=network-online.target
After=network-online.target

[Service]
User=besu
Group=besu
Type=simple
Restart=always
RestartSec=5
Environment="JAVA_OPTS=-Xmx5g"
ExecStart=/usr/local/bin/besu/bin/besu \
  --network=mainnet \
  --sync-mode=SNAP \
  --data-path=/var/lib/besu \
  --data-storage-format=BONSAI \
  --engine-jwt-secret=/var/lib/jwtsecret/jwt.hex

[Install]
WantedBy=multi-user.target
Notable flags:
Environment="JAVA_OPTS=-Xmx5g" Sets the maximum Java heap size, which defines the maximum amount of memory the besu process can utilize. The value shown here is 5g (5 gigabytes of RAM). The higher the Xmx, the faster the initial sync, to a maximum of 8g (8 gigabytes of RAM). Besu never needs more than -Xmx8g. Note that on a single machine the available RAM will need to accommodate both the Execution Client and Consensus client. More information here and here and here.
--sync-mode=SNAP The recommended method of syncing against the Ethereum blockchain when using the BONSAI data storage format. More information here.
--data-storage-format=BONSAI A storage and lookup efficient method for managing blockchain data. More information here.
--engine-jwt-secret=/var/lib/jwtsecret/jwt.hex The path to the shared secret authentication token that is required for communication between the Execution and Consensus clients.
-- Xplugin-rocksdb-high-spec-enabled (optional, not shown above). Add this flag to improve performance on servers running 16 GB RAM or greater. More information here.
Check the screenshot below for reference.

Press <CTRL> + X then Y then <ENTER> to save and exit.
Reload systemd to reflect the changes and start the service. Check the status to make sure it’s running correctly.
$ sudo systemctl daemon-reload
$ sudo systemctl start besu
$ sudo systemctl status besu
Check the screenshot below for reference. It should say active (running) in green text. If not then go back and repeat the steps to fix the problem.

Press Q to quit (will not affect the besu service).
The sync will begin immediately. Use the journal output to follow the progress or check for errors by running the following command.
$ sudo journalctl -fu besuCheck the screenshot below for reference.

Press <CTRL>+ C to exit (will not affect the besu service).
Enable the besu service to automatically start on reboot.
$ sudo systemctl enable besuNOTE: It is necessary to follow a specific series of steps to update the Besu client software. See Appendix A — Updating Besu for further information.
Install the Execution Client — Erigon
Install the Erigon Execution Client by downloading the latest version.
NOTE: Erigon requires a minimum of 16GB RAM. More information here.
Go here to get the Latest release of Erigon.

In the Assets section copy the download link to the linux_amd64.tar.gz file. Be sure to copy the correct link.
Download the archive using the commands below. Modify the URL to match the download link for the latest version.
$ cd ~
$ curl -LO https://github.com/ledgerwatch/erigon/releases/download/v2.60.1/erigon_2.60.1_linux_amd64.tar.gz
Extract the files from the Erigon archive and copy to the /usr/local/bin directory. The erigon service will run it from there.
$ tar xvf erigon_2.60.1_linux_amd64.tar.gz
$ sudo cp erigon /usr/local/bin
Clean up the files. Modify the file name to match the downloaded version.
$ rm erigon_2.60.1_linux_amd64.tar.gz
$ rm erigon && rm README.md
Erigon will be configured to run as a background service. Create an account for the service to run under. This type of account can’t log into the server.
$ sudo useradd --no-create-home --shell /bin/false erigonCreate the data directory. This is required for storing the Ethereum blockchain data.
$ sudo mkdir -p /var/lib/erigonSet directory permissions. The erigon user account needs permission to modify the data directory.
$ sudo chown -R erigon:erigon /var/lib/erigonCreate a systemd service config file to configure the service.
$ sudo nano /etc/systemd/system/erigon.servicePaste the following service configuration into the file.
[Unit]
Description=Erigon Execution Client (Mainnet)
After=network.target
Wants=network.target

[Service]
User=erigon
Group=erigon
Type=simple
Restart=always
RestartSec=5
ExecStart=/usr/local/bin/erigon \
  --chain=mainnet \
  --datadir=/var/lib/erigon \
  --authrpc.jwtsecret=/var/lib/jwtsecret/jwt.hex \
  --private.api.addr= \
  --prune.r.before=11052984 \
  --prune htc

[Install]
WantedBy=default.target
Notable flags:
To see information on flags use the following command:
$ /usr/local/bin/./erigon --help--authrpc.jwtsecret=/var/lib/jwtsecret/jwt.hex The path to the shared secret authentication token that is required for communication between the Execution and Consensus clients.
--private.api.addr= Disables the private RPC server. If required, remove the flag to enable it.
--prune.r.before=11052984 Prune blockchain receipts before the specified block. This is the deposit contract block for the network, as defined here.
--prune htc Prune blockchain data for ( h )istory, ( t )ransaction lookups, and ( c )all traces.
Check the screenshot below for reference.

Press <CTRL> + X then Y then <ENTER> to save and exit.
Reload systemd to reflect the changes and start the service. Check the status to make sure it’s running correctly.
$ sudo systemctl daemon-reload
$ sudo systemctl start erigon
$ sudo systemctl status erigon
Check the screenshot below for reference. It should say active (running) in green text. If not then go back and repeat the steps to fix the problem.
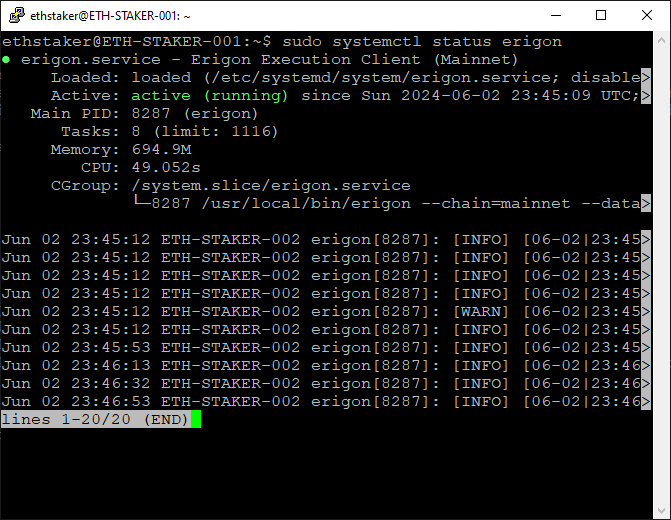
Press Q to quit (will not affect the erigon service).
The sync will begin immediately. Use the journal output to follow the progress or check for errors by running the following command.
$ sudo journalctl -fu erigonCheck the screenshot below for reference.
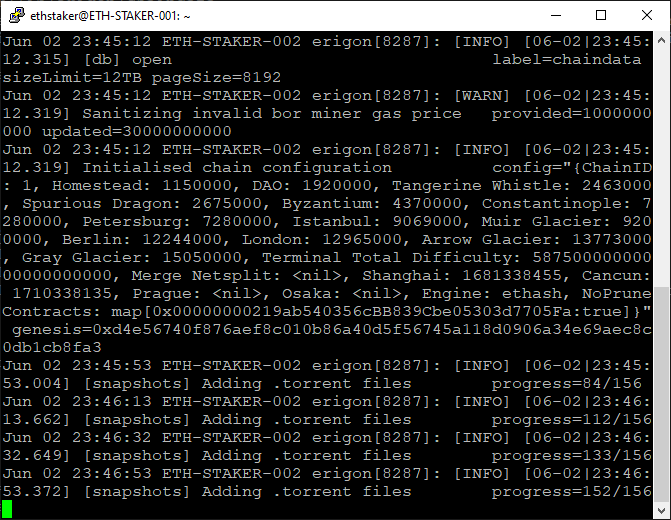
Press <CTRL>+ C to exit (will not affect the erigon service).
Enable the erigon service to automatically start on reboot.
$ sudo systemctl enable erigonNOTE: It is necessary to follow a specific series of steps to update the Erigon client software. See Appendix B — Updating Erigon for further information.

Install the Execution Client — Geth
Install the Geth Execution Client by downloading the latest version.
Go here to get the Latest release of Geth.

Right-click on the For Linux button and copy the download link to the tar.gz file. Be sure to copy the correct link.
Download the archive using the commands below. Modify the URL to match the download link for the latest version.
$ cd ~
$ curl -LO https://gethstore.blob.core.windows.net/builds/geth-linux-amd64-1.14.5-0dd173a7.tar.gz
Extract the files from the archive and copy to the /usr/local/bin directory. The geth service will run it from there. Modify the file name to match the downloaded version.
$ tar xvf geth-linux-amd64-1.14.5-0dd173a7.tar.gz
$ cd geth-linux-amd64-1.14.5-0dd173a7
$ sudo cp geth /usr/local/bin
Clean up the files. Modify the file name to match the downloaded version.
$ cd ~
$ rm geth-linux-amd64-1.14.5-0dd173a7.tar.gz
$ rm -r geth-linux-amd64-1.14.5-0dd173a7
Geth will be configured to run as a background service. Create an account for the service to run under. This type of account can’t log into the server.
$ sudo useradd --no-create-home --shell /bin/false gethCreate the data directory. This is required for storing the Ethereum blockchain data.
$ sudo mkdir -p /var/lib/gethSet directory permissions. The geth user account needs permission to modify the data directory.
$ sudo chown -R geth:geth /var/lib/gethCreate a systemd service config file to configure the service.
$ sudo nano /etc/systemd/system/geth.servicePaste the following service configuration into the file.
[Unit]
Description=Geth Execution Client (Mainnet)
After=network.target
Wants=network.target

[Service]
User=geth
Group=geth
Type=simple
Restart=always
RestartSec=5
TimeoutStopSec=600
ExecStart=/usr/local/bin/geth \
  --mainnet \
  --datadir /var/lib/geth \
  --authrpc.jwtsecret /var/lib/jwtsecret/jwt.hex \
  --db.engine pebble

[Install]
WantedBy=default.target
NOTE: A previous version of this guide was using
/var/lib/goethereumfor thedatadir. If you used that in your original setup it is safe to continue to use it — you do not need to modify the path. The config above should then read--datadir /var/lib/goethereum.NOTE: The inclusion of
TimeoutStopSec=600is to allow the Geth service sufficient time to write cached data to disk on shutdown. More information here.
Notable flags:
--authrpc.jwtsecret /var/lib/jwtsecret/jwt.hex The path to the JWT file that is required for authenticated communication between the Execution and Consensus clients. Enables the Engine API RPC endpoint. Setting this will expose an authenticated HTTP endpoint (http://127.0.0.1:8551).
--db.engine pebble Specifies the use of the new backing database “Pebble”. More information here.
Check the screenshot below for reference.

Press <CTRL> + X then Y then <ENTER> to save and exit.
Reload systemd to reflect the changes and start the service. Check the status to make sure it’s running correctly.
$ sudo systemctl daemon-reload
$ sudo systemctl start geth
$ sudo systemctl status geth
Check the screenshot below for reference. It should say active (running) in green text. If not then go back and repeat the steps to fix the problem.
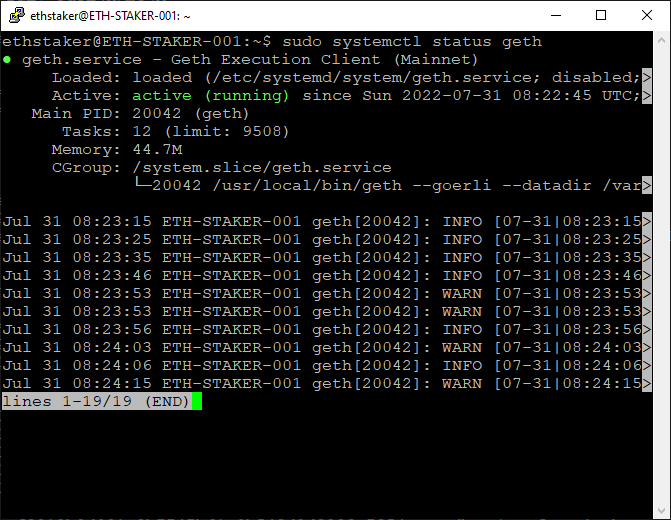
Press Q to quit (will not affect the geth service).
The sync will begin immediately. Use the journal output to follow the progress or check for errors by running the following command.
$ sudo journalctl -fu gethCheck the screenshot below for reference.
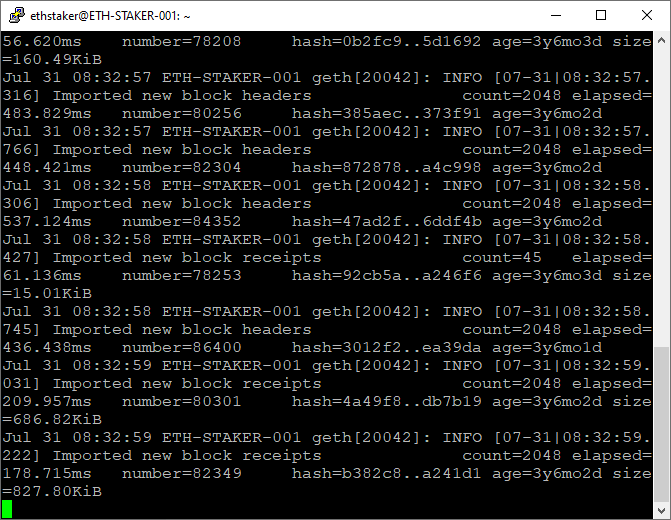
Press <CTRL>+ C to exit (will not affect the geth service).
Enable the geth service to automatically start on reboot.
$ sudo systemctl enable gethNOTE: It is necessary to follow a specific series of steps to update the Geth client software. See Appendix C — Updating Geth for further information.

Install the Execution Client — Nethermind
Install the Nethermind Execution Client by downloading the latest version.
Go here to get the Latest release of Nethermind.


In the Assets section copy the download link to the linux-x64 zip file. Be sure to copy the correct link.
Download the archive using the commands below. Modify the URL in the instructions below to match the download link for the latest version.
$ cd ~
$ curl -LO https://github.com/NethermindEth/nethermind/releases/download/1.26.0/nethermind-1.26.0-0068729c-linux-x64.zip
Extract the files from the archive and copy to the /usr/local/bin directory. The nethermind service will run it from there. Modify the file name to match the downloaded version.
$ sudo apt-get install -y unzip
$ unzip nethermind-1.26.0-0068729c-linux-x64.zip -d nethermind
$ sudo cp -a nethermind /usr/local/bin/nethermind
Clean up the files. Modify the file name to match the downloaded version.
$ rm nethermind-1.26.0-0068729c-linux-x64.zip
$ rm -r nethermind
Nethermind will be configured to run as a background service. Create an account for the service to run under. This type of account can’t log into the server.
$ sudo useradd --no-create-home --shell /bin/false nethermindCreate the data directory. This is required for storing the Ethereum blockchain data.
$ sudo mkdir -p /var/lib/nethermindSet directory permissions. The nethermind user account needs permission to modify the data directory and the binary directory (for logging).
$ sudo chown -R nethermind:nethermind /var/lib/nethermindCreate a systemd service config file to configure the service.
$ sudo nano /etc/systemd/system/nethermind.servicePaste the following service configuration into the file.
[Unit]
Description=Nethermind Execution Client (Mainnet)
After=network.target
Wants=network.target

[Service]
User=nethermind
Group=nethermind
Type=simple
Restart=always
RestartSec=5
WorkingDirectory=/var/lib/nethermind
Environment="DOTNET_BUNDLE_EXTRACT_BASE_DIR=/var/lib/nethermind"
ExecStart=/usr/local/bin/nethermind/nethermind \
  --config mainnet \
  --datadir /var/lib/nethermind \
  --Sync.SnapSync true \
  --JsonRpc.JwtSecretFile /var/lib/jwtsecret/jwt.hex \
  --Pruning.Mode Hybrid \
  --Pruning.FullPruningTrigger VolumeFreeSpace \
  --Pruning.FullPruningThresholdMb 285000

[Install]
WantedBy=default.target
Notable flags:
--SnapSync true Enables both the SnapSync and FastSync features. More information here.
--JsonRpc.JwtSecretFile /var/lib/jwtsecret/jwt.hex The path to the JWT file that is required for authenticated communication between the Execution and Consensus clients.
--Pruning.Mode Hybrid --Pruning.FullPruningTrigger VolumeFreeSpace --Pruning.FullPruningThresholdMb 285000 Enables automated pruning of the historical data to free up disk space. Triggers when available disk space reaches 285GB. More information here.
Check the screenshot below for reference.
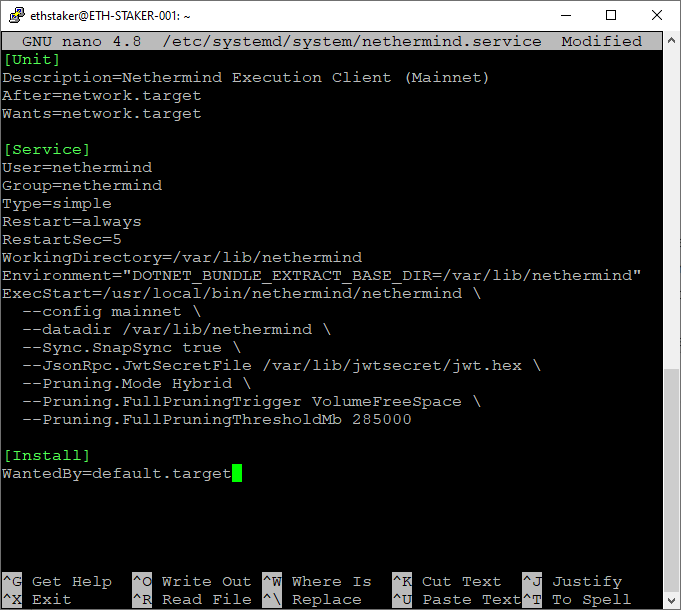
Press <CTRL> + X then Y then <ENTER> to save and exit.
Reload systemd to reflect the changes and start the service. Check the status to make sure it’s running correctly.
$ sudo systemctl daemon-reload
$ sudo systemctl start nethermind
$ sudo systemctl status nethermind
Check the screenshot below for reference. It should say active (running) in green text. If not then go back and repeat the steps to fix the problem.

Press Q to quit (will not affect the nethermind service).
The sync will begin immediately. Use the journal output to follow the progress or check for errors by running the following command.
$ sudo journalctl -fu nethermindCheck the screenshot below for reference.

Press <CTRL>+ C to exit (will not affect the nethermind service).
Enable the nethermind service to automatically start on reboot.
$ sudo systemctl enable nethermindNOTE: It is necessary to follow a specific series of steps to update the Nethermind client software. See Appendix D — Updating Nethermind for further information.

Install the Execution Client — Reth
Install the Reth Execution Client by downloading the latest version.
Go here to get the Latest release of Reth.


In the Binaries section copy the download link to the x86_64-unknown-linux-gnu.tar.gz file. Be sure to copy the correct link.
Download the archive using the commands below. Modify the URL to match the download link for the latest version.
$ cd ~
$ curl -LO https://github.com/paradigmxyz/reth/releases/download/v1.0.5/reth-v1.0.5-x86_64-unknown-linux-gnu.tar.gz
Extract the files from the Reth archive and copy to the /usr/local/bin directory. The reth service will run it from there.
$ tar xvf reth-v1.0.5-x86_64-unknown-linux-gnu.tar.gz
$ sudo cp reth /usr/local/bin
Clean up the files.
$ rm reth
$ rm reth-v1.0.5-x86_64-unknown-linux-gnu.tar.gz
Reth will be configured to run as a background service. Create an account for the service to run under. This type of account can’t log into the server.
$ sudo useradd --no-create-home --shell /bin/false rethCreate the data directory. This is required for storing the Ethereum blockchain data.
$ sudo mkdir -p /var/lib/rethSet directory permissions. The reth user account needs permission to modify the data directory.
$ sudo chown -R reth:reth /var/lib/rethCreate a systemd service config file to configure the service.
$ sudo nano /etc/systemd/system/reth.servicePaste the following service configuration into the file.
[Unit]
Description=Reth Execution Client (Mainnet)
After=network.target
Wants=network.target

[Service]
User=reth
Group=reth
Type=simple
Restart=always
RestartSec=5
ExecStart=reth node \
  --full \
  --datadir /var/lib/reth \
  --authrpc.jwtsecret /var/lib/jwtsecret/jwt.hex \
  --log.file.directory /var/lib/reth/logs \
  --log.file.max-size 50 \
  --log.file.max-files 1

[Install]
WantedBy=default.target
Notable flags:
--full Indicates a full node is to be run (as opposed to an archive node).
--authrpc.jwtsecret /var/lib/jwtsecret/jwt.hex The path to the JWT file that is required for authenticated communication between the Execution and Consensus clients.
--log.file.directory and --log.file.max-size and --log.file.max-files Sets the log file directory, limits the log file size to 50 MB and limits the log file count to 1 log file, respectively.
Check the screenshot below for reference.

Press <CTRL> + X then Y then <ENTER> to save and exit.
Reload systemd to reflect the changes and start the service. Check the status to make sure it’s running correctly.
$ sudo systemctl daemon-reload
$ sudo systemctl start reth
$ sudo systemctl status reth
Check the screenshot below for reference. It should say active (running) in green text. If not then go back and repeat the steps to fix the problem.

Press Q to quit (will not affect the reth service).
The sync will begin after a period of time. Use the journal output to follow the progress or check for errors by running the following command.
$ sudo journalctl -fu rethCheck the screenshot below for reference.

Press <CTRL>+ C to exit (will not affect the reth service).
Enable the reth service to automatically start on reboot.
$ sudo systemctl enable rethNOTE: It is necessary to follow a specific series of steps to update the Reth client software. See Appendix E — Updating Reth for further information.
You should now have installed, configured, and run one of the Execution Clients above. Great job! Next we will configure the Consensus client.
Step 9 — Install the Lighthouse Consensus Client
The Lighthouse Consensus Client is a single binary which encapsulates the functionality of the beacon node and validator, run in separate instances. This step will download and prepare the Lighthouse binary.
First, go here and identify the Latest release. It is at the top of the page. For example:

In the Assets section copy the download link to the lighthouse-v…-x86_64-unknown-linux-gnu.tar.gz file. Be sure to copy the correct link.
Download the archive using the commands below. Modify the URL to match the download link for the latest version.
$ cd ~
$ curl -LO https://github.com/sigp/lighthouse/releases/download/v5.3.0/lighthouse-v5.3.0-x86_64-unknown-linux-gnu.tar.gz
Extract the files from the archive and copy to the /usr/local/bin directory. The Lighthouse service will run it from there. Modify the file name to match the downloaded version.
$ tar xvf lighthouse-v5.3.0-x86_64-unknown-linux-gnu.tar.gz
$ sudo cp lighthouse /usr/local/bin
Clean up the files. Modify the file name to match the downloaded version.
$ rm lighthouse-v5.3.0-x86_64-unknown-linux-gnu.tar.gz
$ rm lighthouse
NOTE: It is necessary to follow a specific series of steps to update Lighthouse. See Appendix F — Updating Lighthouse for further information.
Step 10 — Import the Validator Keys
Configure the Lighthouse validator by importing the validator keys generated in Step 1.
Copy the Validator Keystore Files to the Server
If you generated the validator keystore-[..].json file(s) on a machine other than your Ubuntu server you will need to copy the file(s) over to your home directory. You can do this using a USB drive (if your server is local), or via secure FTP (SFTP).
Place the files here: $HOME/staking-deposit-cli/validator_keys. Create the directories first using the following command, if necessary.
$ sudo mkdir -p $HOME/staking-deposit-cli/validator_keysIf you are using SFTP and you get a permission denied error when copying the files, grant the login account access to the directory using the following command. Replace <yourusername> with the login account username.
$ sudo chown -R <yourusername>:<yourusername> $HOME/staking-deposit-cli/validator_keysCheck the screenshot below for reference.

Import the Validator Keystore Files into Lighthouse
Create a directory to store the validator data.
$ sudo mkdir -p /var/lib/lighthouseRun the validator import process. You will need to provide the directory where the generated keystore-[..].json files are located. E.g. $HOME/staking-deposit-cli/validator_keys.
$ sudo /usr/local/bin/lighthouse --network mainnet account validator import --directory $HOME/staking-deposit-cli/validator_keys --datadir /var/lib/lighthouseYou will be asked to provide the password for the validator keys. This is the password you set when you created the keys during Step 1.
You will be prompted to enter the password for each key, one-by-one. Be sure to provide the correct password each time because the validator will be running as a service and it needs to persist the password(s) to a file so it can access the key(s) at runtime.
NOTE: The validator data is saved in the following location created during the keystore import process:
/var/lib/lighthouse/validators.
Check the screenshot below for reference.

The import is complete and the wallet is now set up.
NOTE: It is necessary to follow a specific series of steps to add an additional validator. See Appendix G — Adding Validators for further information.
Step 11 — Configure the Beacon Node Service
In this step you will configure and run the Lighthouse beacon node as a service so if the system restarts the process will automatically start back up again.
Set up the Account
Create an account for the service to run under. This type of account can’t log into the server.
$ sudo useradd --no-create-home --shell /bin/false lighthousebeaconSet up the Directories and the Permissions
Create the data directory for the Lighthouse beacon node database and set permissions.
$ sudo mkdir -p /var/lib/lighthouse/beacon
$ sudo chown -R lighthousebeacon:lighthousebeacon /var/lib/lighthouse/beacon
Create and Configure the Service
Create a systemd service config file to configure the service.
$ sudo nano /etc/systemd/system/lighthousebeacon.servicePaste the following into the file.
[Unit]
Description=Lighthouse Consensus Client BN (Mainnet)
Wants=network-online.target
After=network-online.target

[Service]
User=lighthousebeacon
Group=lighthousebeacon
Type=simple
Restart=always
RestartSec=5
ExecStart=/usr/local/bin/lighthouse bn \
  --network mainnet \
  --datadir /var/lib/lighthouse \
  --http \
  --execution-endpoint http://127.0.0.1:8551 \
  --execution-jwt /var/lib/jwtsecret/jwt.hex \
  --checkpoint-sync-url CheckpointSyncURL

[Install]
WantedBy=multi-user.target
NOTE: Be sure to set the
CheckpointSyncURLabove to a valid checkpoint sync URL. See below for more information.
Notable flags:
bn subcommand instructs the lighthouse binary to run as a beacon node.
--prune-payloads (Not shown above). This is a flag to set the pruning status on the Lighthouse database. When peers request blocks from Lighthouse it can either get them from the Lighthouse database or the EC. Getting from EC is overhead for the EC which can cause problems if performance is an issue. Using --prune-payloads false will allow peers to get blocks from the Lighthouse database, avoiding the extra call to the EC. Conversely you can save disk space by pruning using --prune-payloads true. More information here.
--http Exposes an http endpoint which is used by the validator client to connect to the beacon node.
--execution-endpoint http://127.0.0.1:8551 The address of the Execution Client. Should be the same for all Execution Clients detailed in this guide.
--execution-jwt /var/lib/jwtsecret/jwt.hex The path to the JWT file that is required for authenticated communication between the Execution and Consensus clients.
--checkpoint-sync-url Enables the Checkpoint Sync feature to greatly speed up the Beacon Chain Node sync. More information here. Provide a URL to a synced Beacon Chain Node for the sync. You can get one here.
--logfile-max-number X and --logfile-max-size Y (Optional, not shown above). Add these flags to adjust log file settings. Max number is number of log files, and max size is the size of each log file. Default requires 1GB of storage for logs. To reduce this to 50MB, for example, use the following settings: --logfile-max-number 2 and --logfile-max-size 25.
Check the screenshot below for reference.

Press <CTRL> + X then Y then <ENTER> to save and exit.
Reload systemd to reflect the changes and start the service. Check the status to make sure it’s running correctly.
$ sudo systemctl daemon-reload
$ sudo systemctl start lighthousebeacon
$ sudo systemctl status lighthousebeacon
Check the screenshot below for reference. It should say active (running) in green text. If not then go back and repeat the steps to fix the problem.
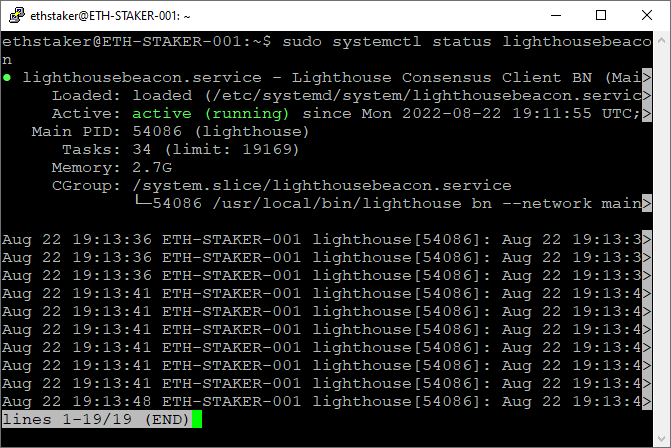
Press Q to quit (will not affect the lighthousebeacon service).
The sync will begin immediately.
NOTE: In order to be able to stake both the Execution Client and the Consensus Client must be fully synced.
Use the journal output to follow the progress or check for errors by running the following command.
$ sudo journalctl -fu lighthousebeaconCheck the screenshot below for reference.

NOTE: The Lighthouse client will not attempt to perform validator duties without a connection to a fully synced Execution Client.
Enable the service to automatically start on reboot.
$ sudo systemctl enable lighthousebeaconStep 12 — Configure the Validator Service
In this step you will configure and run the Lighthouse validator as a service so if the system restarts the process will automatically start back up again.
Set up the Validator Node Account and Directory
Create an account for the validator node to run under. This type of account can’t log into the server.
$ sudo useradd --no-create-home --shell /bin/false lighthousevalidatorIn Step 10 the validator import process created the following directory: /var/lib/lighthouse/validators. Set directory permissions so the lighthousevalidator account can modify that directory.
$ sudo chown -R lighthousevalidator:lighthousevalidator /var/lib/lighthouse/validatorsCreate and Configure the Service
Create a systemd service file to store the service config.
$ sudo nano /etc/systemd/system/lighthousevalidator.servicePaste the following into the file.
[Unit]
Description=Lighthouse Consensus Client VC (Mainnet)
Wants=network-online.target
After=network-online.target

[Service]
User=lighthousevalidator
Group=lighthousevalidator
Type=simple
Restart=always
RestartSec=5
ExecStart=/usr/local/bin/lighthouse vc \
  --network mainnet \
  --datadir /var/lib/lighthouse \
  --suggested-fee-recipient FeeRecipientAddress \
  --graffiti "<yourgraffiti>"

[Install]
WantedBy=multi-user.target
NOTE: Be sure to set the
FeeRecipientAddressabove to a valid Ethereum address within your control to receive the validator fees. For example:--suggested-fee-recipient 0xd8dA6BF26964aF9D7eEd9e03E53415D37aA96045
Notable flags:
vc subcommand instructs the lighthouse binary to run as a validator node.
--suggested-fee-recipient FeeRecipientAddress Validators can receive tips from user transactions. Provide an Ethereum address within your control to specify where the tips should go.
--graffiti “<yourgraffiti>" Replace with your own graffiti string (max 32 characters). For security and privacy reasons avoid information that can uniquely identify you. E.g. --graffiti "Validatooor".
Check the screenshot below for reference.

Press <CTRL> + X then Y then <ENTER> to save and exit.
Reload systemd to reflect the changes and start the service. Check the status to make sure it’s running correctly.
$ sudo systemctl daemon-reload
$ sudo systemctl start lighthousevalidator
$ sudo systemctl status lighthousevalidator
Check the screenshot below for reference. It should say active (running) in green text. If not then go back and repeat the steps to fix the problem.

Press Q to quit (will not affect the lighthousevalidator service).
The sync will begin immediately.
NOTE: In order to be able to stake both the Execution Client and the Consensus Client must be fully synced.
Use the journal output to follow the progress or check for errors by running the following command.
$ sudo journalctl -fu lighthousevalidatorCheck the screenshot below for reference.

Enable the service to automatically start on reboot.
$ sudo systemctl enable lighthousevalidatorYou should now have installed, configured, and run the Lighthouse Consensus Client. Great job! Next we will perform the deposit to activate your validators on the network.
Step 13 — Fund the Validator Keys
Now that the Consensus Client is up and running, to actually begin staking on the Ethereum network you will need to deposit ETH to fund your validators.
NOTE: If you have already submitted your staking deposits you can skip this step.
This step involves depositing the required amount of ETH to the Ethereum deposit contract. DO NOT SEND ETH TO THE DEPOSIT CONTRACT. Rather, this is done in a web browser running your MetaMask (or other) wallet via the Ethereum Launchpad website.
NOTE: You should wait until your Execution Client and Consensus Client have fully synced before proceeding with the deposit. If they have not and your validator(s) become active on the network you would be subject to inactivity penalties.
Go here: https://launchpad.ethereum.org/
Click on Become a Validator, click through the warning steps and continue through the screens until you get to the Generate Key Pairs section. Select the number of validators you are going to run. Choose a value that matches the number of validators you created in Step 1.

Scroll down, check the box if you agree, and click Continue.

You will be asked to upload the deposit_data-[timestamp].json file. You generated this file in Step 1. You may need to copy the file to the computer you are running the Launchpad from. There are no security concerns copying the file. Browse or drag the file to upload and click continue.

Connect your wallet. Choose MetaMask (or one of the other supported wallets), log in, select the account where you have your ETH and click Continue.
Your MetaMask balance will be displayed. The site will allow you to continue if you have selected Mainnet and you have sufficient ETH balance.
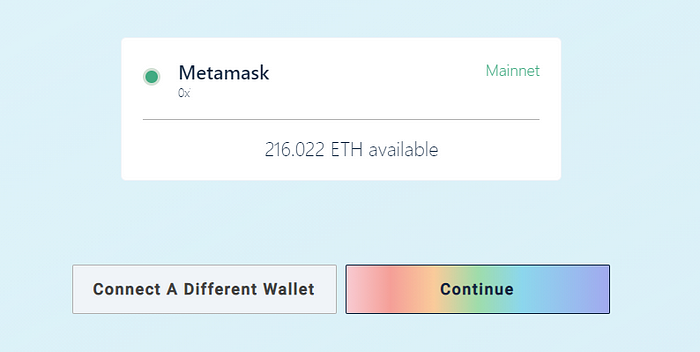
A summary shows the number of validators and total amount of ETH required. Tick the boxes if you agree and click continue.

If you are ready to deposit click on Initiate All Transactions.
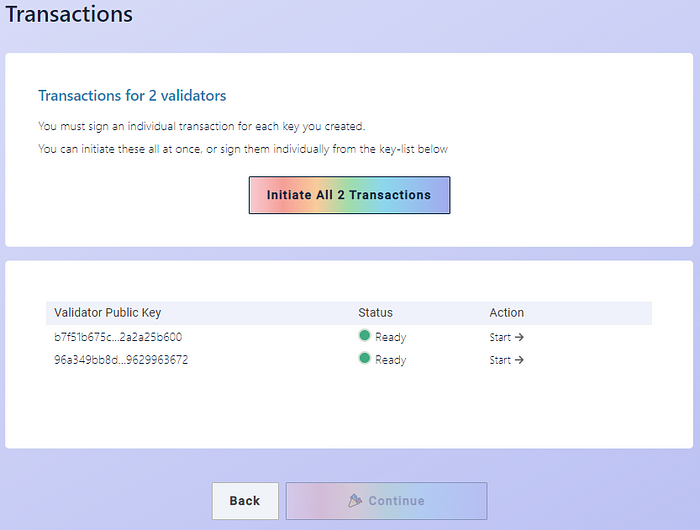
This will pop open MetaMask (or one of the other supported wallets) where you can confirm each transaction.
Once all the transactions have successfully completed you are done!
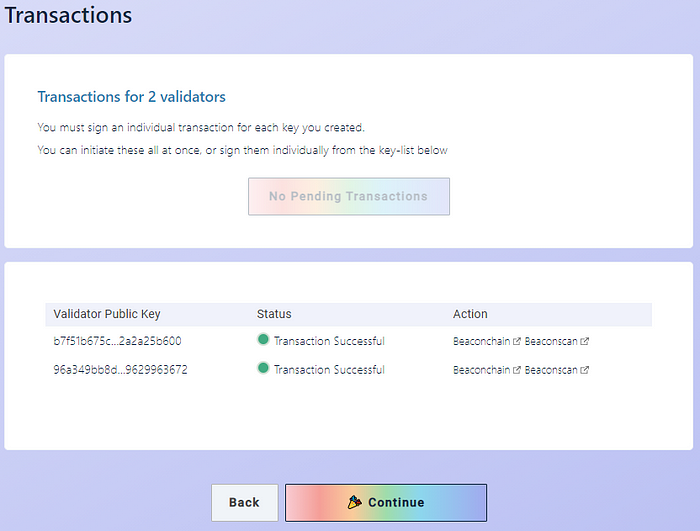
Congratulations you have deposited your stake!
Check the Status of Your Validator Deposits
Newly added validators can take a while to activate. You can check the status of your keys with these steps:
- Copy your MetaMask (or other) wallet address used to make the deposit.
- Go here: https://beaconcha.in/
- Search for your key(s) using your wallet address.

Digging into a specific validator we see a Status section that provides an estimate until activation for each validator.
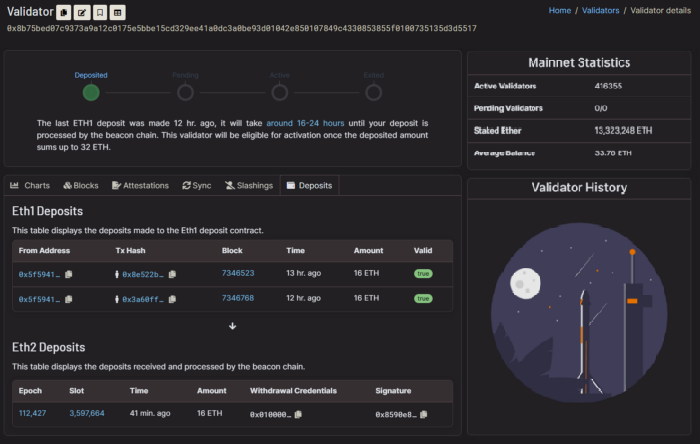
That’s it. You now have a functioning Execution and Consensus client and the staking deposit done. Once your deposit is active you will automatically begin staking and earning rewards. Probably a good time to get a fresh beverage and hydrate.
Congratulations: You are officially an Ethereum Staker!
NOTE: At some point in the future you may want to exit your validators. If so, see Appendix H — Exiting Validators for more information.
Final Remarks and Recommended Next Steps
Thanks for the opportunity. Hopefully this guide was helpful for you.
Next steps
- Reboot your machine and make sure all services come back up
- Understand how to update the client and server software
- Use
htop,df -h, orncdu /to monitor resources on the local machine - Review Appendix I — Manage Systemd Journal Logs to manage log size
- Get familiar with beaconcha.in so you can monitor your validators
- Use the beaconcha.in mobile app to monitor your validators
- Check my testnet guides for details on setting up Grafana monitoring
- Join the Ethstaker and and Lighthouse Discord for important notifications
- Share feedback on Discord (somer112), Twitter, or Reddit
- Help others on the EthStaker Discord or EthStaker Reddit
- Share this guide with your friends!
- Tips appreciated:
- somer.eth
- 0x32B74B90407309F6637245292cd90347DE658A37
Further Reading
It is strongly recommended that you evaluate information from as many sources as possible. These are additional resources to help familiarize yourself with staking on Ethereum.
The author has not verified these resources. Use at your own risk.
- Ethereum Foundation
- Execution Client docs: Besu / Erigon / Geth / Nethermind / Reth
- Consensus Client docs: Lighthouse / Lodestar / Prysm / Nimbus / Teku
- CoinCashew Guides
- Metanull-Operator Guide
- Remy Roy EthStaker Guides
- ETH Docker Docs
Appendix A — Updating Besu
If you need to update to the latest version of Besu follow these steps.
Go here to get the Latest release of Besu. In the Download link section copy the download link to the tar.gz file. Be sure to copy the correct link.
Modify the URL in the instructions below to match the download link for the latest version.
$ cd ~
$ curl -LO https://github.com/hyperledger/besu/releases/download/24.5.2/besu-24.5.2.tar.gz
NOTE: As of
24.6.xBesu requires Java 21 to run. Use$ java -versionto determine the version you have installed. If it is not 21 or greater, then run the following command$ sudo apt -y install openjdk-21-jre-headlessto install Java 21 before updating.
Stop the Besu service.
$ sudo systemctl stop besuExtract the files from the archive and copy to the /usr/local/bin directory. Modify the file name to match the downloaded version.
$ tar xvf besu-24.5.2.tar.gz
$ sudo rm -r /usr/local/bin/besu # <-- Remove the old files
$ sudo cp -a besu-24.5.2 /usr/local/bin/besu
Restart the services and check for errors.
$ sudo systemctl start besu
$ sudo systemctl status besu # <-- Check for errors
$ sudo journalctl -fu besu # <-- Monitor
$ sudo journalctl -fu lighthousebeacon # <-- Monitor
Clean up the files. Modify the file name to match the downloaded version.
$ cd ~
$ rm besu-24.5.2.tar.gz
$ rm -r besu-24.5.2
Appendix B — Updating Erigon
If you need to update to the latest version of Erigon follow these steps.
Go here to get the Latest release of Erigon. In the Assets section copy the download link to the linux_amd64.tar.gz file. Be sure to copy the correct link.
Modify the URL in the instructions below to match the download link for the latest version.
$ cd ~
$ curl -LO https://github.com/ledgerwatch/erigon/releases/download/v2.60.1/erigon_2.60.1_linux_amd64.tar.gz
Extract the files from the Erigon archive. Modify the file name to match the downloaded version.
$ tar xvf erigon_2.60.1_linux_amd64.tar.gzStop the Erigon service.
$ sudo systemctl stop erigonCopy to the /usr/local/bin directory.
$ cd ~
$ sudo cp erigon /usr/local/bin
Restart Erigon and check for errors.
$ sudo systemctl start erigon
$ sudo systemctl status erigon # <-- Check for errors
$ sudo journalctl -fu erigon <-- Monitor
$ sudo journalctl -fu lighthousebeacon # <-- Monitor
Clean up the files. Modify the file name to match the downloaded version.
$ rm erigon_2.60.1_linux_amd64.tar.gz
$ rm erigon && rm README.md
Appendix C — Updating Geth
If you need to update to the latest version of Geth follow these steps.
NOTE: If you installed Geth using an earlier version of this guide using PPA’s (Personal Package Archives) then skip ahead to the steps at the end of this Appendix instead.
First, go here and right-click on the For Linux button and copy the download link to the tar.gz file. Be sure to copy the correct link.
Modify the URL in the instructions below to match the download link for the latest version.
$ cd ~
$ curl -LO https://gethstore.blob.core.windows.net/builds/geth-linux-amd64-1.14.5-0dd173a7.tar.gz
Stop the Geth service.
$ sudo systemctl stop gethExtract the files from the archive and copy to the /usr/local/bin directory. Modify the file name to match the downloaded version.
$ tar xvf geth-linux-amd64-1.14.5-0dd173a7.tar.gz
$ cd geth-linux-amd64-1.14.5-0dd173a7
$ sudo cp geth /usr/local/bin
Restart the services and check for errors.
$ sudo systemctl start geth
$ sudo systemctl status geth # <-- Check for errors
$ sudo journalctl -fu geth # <-- Monitor
$ sudo journalctl -fu lighthousebeacon # <-- Monitor
Clean up the files. Modify the file name to match the downloaded version.
$ cd ~
$ rm geth-linux-amd64-1.14.5-0dd173a7.tar.gz
$ rm -r geth-linux-amd64-1.14.5-0dd173a7
OPTIONAL: If you are running Geth configured via a previous version of this guide using PPA’s (Personal Package Archives) then follow these steps instead.
$ sudo systemctl stop geth
$ sudo apt update && sudo apt upgrade
$ sudo systemctl start geth
$ sudo systemctl status geth # <-- Check for errors
$ sudo journalctl -fu geth # <-- Monitor
$ sudo journalctl -fu lighthousebeacon # <-- Monitor
OR: If you would like up modify your geth setup to match this guide, see the steps detailed here.
Appendix D — Updating Nethermind
If you need to update to the latest version of Nethermind follow these steps.
First, go here and identify the Latest release. In the Assets section copy the download link to the linux-x64 zip file. Be sure to copy the correct link.
Modify the URL in the instructions below to match the download link for the latest version.
$ cd ~
$ curl -LO https://github.com/NethermindEth/nethermind/releases/download/1.26.0/nethermind-1.26.0-0068729c-linux-x64.zip
Stop the Nethermind service.
$ sudo systemctl stop nethermindExtract the files from the archive and copy to the /usr/local/bin directory. Modify the file name to match the downloaded version.
$ unzip nethermind-1.26.0-0068729c-linux-x64.zip -d nethermind
$ sudo rm -r /usr/local/bin/nethermind # <-- Remove the old files
$ sudo cp -a nethermind /usr/local/bin/nethermind
Restart the services and check for errors.
$ sudo systemctl start nethermind
$ sudo systemctl status nethermind # <-- Check for errors
$ sudo journalctl -fu nethermind # <-- Monitor
$ sudo journalctl -fu lighthousebeacon # <-- Monitor
Clean up the files. Modify the file name to match the downloaded version.
$ rm nethermind-1.26.0-0068729c-linux-x64.zip
$ rm -r nethermind
Appendix E — Updating Reth
If you need to update to the latest version of Reth follow these steps.
Go here to get the Latest release of Reth. In the Binaries section copy the download link to the x86_64-unknown-linux-gnu.tar.gz file. Be sure to copy the correct link.
Modify the URL to match the download link for the latest version.
$ cd ~
$ curl -LO https://github.com/paradigmxyz/reth/releases/download/v1.0.5/reth-v1.0.5-x86_64-unknown-linux-gnu.tar.gz
Stop the Reth service.
$ sudo systemctl stop rethExtract the files from the archive and copy to the /usr/local/bin directory. Modify the file name to match the downloaded version.
$ tar xvf reth-v1.0.5-x86_64-unknown-linux-gnu.tar.gz
$ sudo cp reth /usr/local/bin
Restart the services and check for errors.
$ sudo systemctl start reth
$ sudo systemctl status reth # <-- Check for errors
$ sudo journalctl -fu reth # <-- Monitor
$ sudo journalctl -fu lighthousebeacon # <-- Monitor
Clean up the files. Modify the file name to match the downloaded version.
$ rm reth-v1.0.5-x86_64-unknown-linux-gnu.tar.gz
$ rm reth
Appendix F — Updating Lighthouse
If you need to update to the latest version of Lighthouse follow these steps.
First, go here and identify the Latest release. In the Assets section copy the download link to the lighthouse-v…-x86_64-unknown-linux-gnu.tar.gz file. Be sure to copy the correct link.
Modify the URL in the instructions below to match the download link for the latest version.
$ cd ~
$ curl -LO https://github.com/sigp/lighthouse/releases/download/v5.3.0/lighthouse-v5.3.0-x86_64-unknown-linux-gnu.tar.gz
Stop the Lighthouse client services.
$ sudo systemctl stop lighthousevalidator
$ sudo systemctl stop lighthousebeacon
Extract the binary from the archive and copy to the /usr/local/bin directory. Modify the file name to match the downloaded version.
$ tar xvf lighthouse-v5.3.0-x86_64-unknown-linux-gnu.tar.gz
$ sudo cp lighthouse /usr/local/bin
Restart the services and check for errors.
$ sudo systemctl start lighthousebeacon
$ sudo systemctl status lighthousebeacon # <-- Check for errors
$ sudo journalctl -fu lighthousebeacon # <-- Monitor
$ sudo systemctl start lighthousevalidator
$ sudo systemctl status lighthousevalidator # <-- Check for errors
$ sudo journalctl -fu lighthousevalidator # <-- Monitor
Clean up the extracted files.
$ rm lighthouse-v5.3.0-x86_64-unknown-linux-gnu.tar.gz
$ rm lighthouse
Appendix G — Adding Validators
If you want to add one or more validators to Lighthouse use the following steps.
NOTE: This appendix assumes that you have already followed the guide and completed all of the steps. Do not use this section to add validators to an empty validator wallet/incomplete setup.
Generate Deposit Data
You will need to generate deposit data for your new validator(s). This will be used to add the new validator(s) to your existing wallet.
Go here to get the “Latest release” of the deposit command line interface (CLI) app.
Transfer the binary to a USB stick and copy to an air-gapped machine for safety (recommended), or if not available, copy to a machine that is not connected to the network/internet (not recommended).
On the secure machine run the binary file in a terminal window (or CMD in Windows) and continue using the commands below.
The existing-mnemonic command is used to re-generate or derive new validator key(s) from your existing mnemonic. You will need to supply your mnemonic phrase to do this, hence the security requirements.
On Linux:
$ sudo ./deposit existing-mnemonic --validator_start_index <ValidatorStartIndex> --num_validators <NumberOfValidators> --chain mainnet --eth1_withdrawal_address <YourWithdrawalAaddress>On Windows:
deposit.exe existing-mnemonic --validator_start_index <ValidatorStartIndex> --num_validators <NumberOfValidators> --chain mainnet --eth1_withdrawal_address <YourWithdrawalAaddress>Replace <ValidatorStartIndex> with the start index of the new validator(s) you are adding. For example: If you have 2 existing validators (#0, #1) and you want to add one more, you would specify 2 (being the next number in the sequence) as the start index. E.g. --validator_start_index 2.
NOTE: Double check the start index. Be sure you use the correct value.
Replace <NumberOfValidators> with the number of validators you want to fund. Each validator requires a 32 ETH deposit to fund.
Replace <YourWithdrawalAddress> with an Ethereum address within your control.
NOTE: Once set, the withdrawal address CANNOT be changed, so be ABSOLUTELY SURE that it is an address within your control and correctly specified. For example:
--eth1_withdrawal_address 0xd8dA6BF26964aF9D7eEd9e03E53415D37aA96045NOTE: The flag
--eth1_withdrawal_addressallows you to specify an Ethereum address that your staking rewards in excess of 32 staked ETH will automatically be withdrawn to (once withdrawals are enabled). This will also be the address your 32 ETH will be withdrawn to if you exit the validator. More information here.NOTE: If you don’t set the
--eth1_withdrawal_addressflag at this time, you can set it later via a special process (known as converting the withdrawal credential from0x00to0x01) when you are ready to start withdrawing the staking rewards or when you want to exit the validator. If you don’t set the flag, staking rewards in excess of 32 ETH will not be automatically withdrawn and you will not be able to reclaim the 32 ETH deposit upon exiting the validator until you convert the withdrawal credential.
From the example above, we are adding one new validator: --num_validators 1at start index 2 --validator_start_index 2.
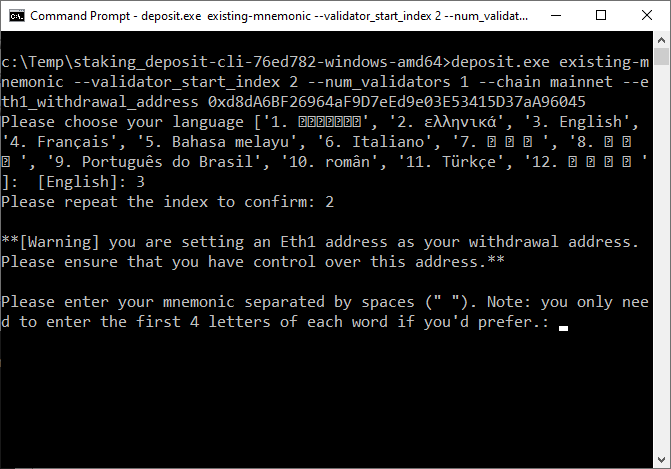
Enter your mnemonic that you should have stored safely after creating your initial validator(s).
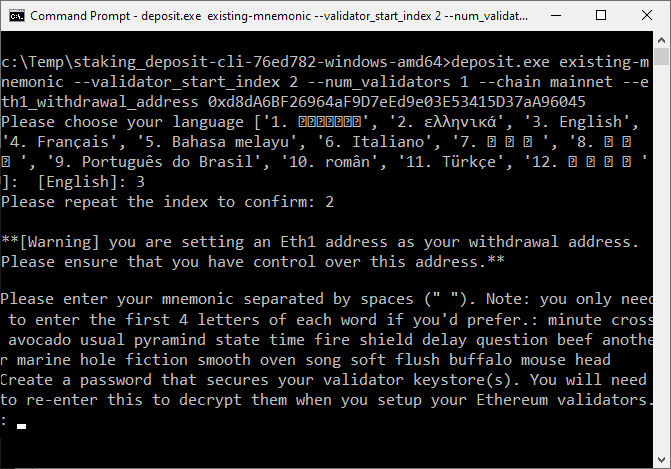
You will be asked to enter your validator keystore password. This password was set in Step 1. You can create a different password here, but it is recommended for simplicity to use the same password as the original keystore. Once you have confirmed your keystore password your validator key(s) will be created.
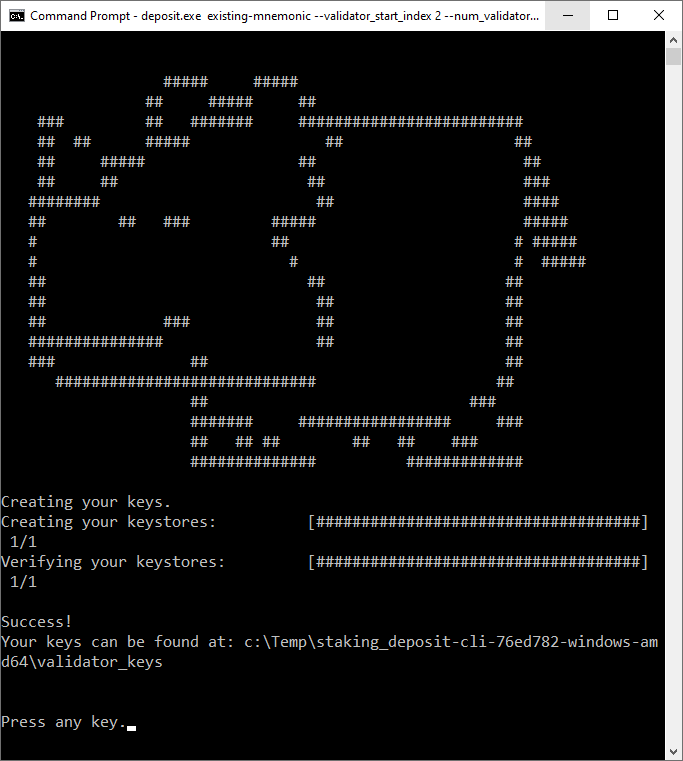
The validator key(s) and deposit data file are created at the specified location. The contents of the directory are shown below.

Notes about the files:
- The newer
deposit_data-[timestamp].jsonfile contains the public key(s) for the newly added validator(s) and information about the staking deposit. This file will be used to complete the ETH staking deposit process later in this guide. - The newly created
keystore-[..].jsonfile(s) contain the encrypted validator signing key. There is one keystore file per additional validator that you are funding. These will be imported into the Consensus Client validator wallet for use during validation operations. - You will copy the files over to your Ubuntu server (if not already there) later in this step.
- If you lose or accidentally delete the files it is possible to regenerate them using the Staking Deposit Tool and your mnemonic via the
existing-mnemoniccommand. More information here.
DO NOT DEPOSIT any ETH at this moment.
It is important to complete and verify your staking setup first. If the ETH deposits become active and your staking setup is not ready, inactivity penalties will be deducted from your staked ETH balance.
Copy the Validator Keystore Files to the Server
If you generated the validator keystore-[..].json file(s) on a machine other than your Ubuntu server you will need to copy the file(s) over to your home directory. You can do this using a USB drive (if your server is local), or via secure FTP (SFTP).
Place the files here: $HOME/staking-deposit-cli/validator_keys. Create the directories if necessary.
To add the new validator keys we will stop the Lighthouse service.
$ sudo systemctl stop lighthousevalidatorRun the validator import process. You will need to provide the directory where the generated keystore-[..].json files are located. E.g. $HOME/staking-deposit-cli/validator_keys.
NOTE: If you have existing
keystore-[..].jsonfiles in thevalidator_keysdirectory that have previously been imported you will be asked for the password during the import, but the process will skip importing them. E.g.Skipping import of keystore for existing public keyandSuccessfully imported 1 validators (2 skipped).
$ sudo /usr/local/bin/lighthouse --network mainnet account validator import --directory $HOME/staking-deposit-cli/validator_keys --datadir /var/lib/lighthouseYou will be asked to provide the password for the validator keys. This is the password you set when you created the keys during Step 1.
You will be prompted to enter the password for each key, one-by-one. Be sure to provide the correct password each time because the validator will be running as a service and it needs to persist the password(s) to a file so it can access the key(s) at runtime.
NOTE: The validator data is saved in the following location created during the keystore import process: /var/lib/lighthouse/validators.
Check the screenshot below for reference.

The import is complete.
Reapply permissions to the validators directory.
$ sudo chown -R lighthousevalidator:lighthousevalidator /var/lib/lighthouse/validatorsRestart the validator and check for errors.
$ sudo systemctl start lighthousevalidator
$ sudo systemctl status lighthousevalidator # <-- Check for errors
$ sudo journalctl -fu lighthousevalidator # <-- Monitor
If you did everything correctly you should see the following output confirming the newly added validator(s).
Note, although the service output may specify 0 new validators, the listing should contain the full set.
INFO Initialized validators enabled: 3, disabled: 0Now that the validators have been imported into your validator and ready to perform duties, you will need to go over to Step 13 — Fund the Validator Keys above and fund the new validators via the Launchpad. You will need to upload the new deposit_data-[timestamp].json file that was created earlier in this section.
NOTE: The new validator(s) will not be fully functional until you complete Step 13 and the validators clear the activation queue.
Appendix H — Exiting Validators
If you would prefer not to participate in staking it is possible to exit your validator(s). Once a validator is exited it cannot rejoin or be used again to stake in the future. The exited validator will not earn rewards or be subject to inactivity penalties.
To exit, run the following commands. Replace <ValidatorPublicKey> with the public key of the validator you wish to exit. E.g. --keystore /var/lib/lighthouse/validators/0x87ad7e70c1e95c287a0666d723cc4575cb1ae3f972cdede9e5c64270229a0918165ecc72c8a2bf01ae49075a63c06681/voting-keystore.json
$ cd ~
$ cd /usr/local/bin
$ lighthouse --network mainnet account validator exit --keystore /var/lib/lighthouse/validators/<ValidatorPublicKey>/voting-keystore.json --beacon-node http://localhost:5052
NOTE: It may take some time for the validators to exit. You may be able to to check the status of the exit by searching for the validator key on https://beaconcha.in/. Once the exit succeeds you can stop your services, if necessary.
Appendix I — Manage Systemd Journal Logs
The systemd services create logs that grow over time. It is possible to clear the logs to free up disk space on your server.
NOTE: The following steps will delete existing log data. Be careful if you require this data for debugging purposes.
Check the amount of disk space the logs are using.
$ sudo journalctl --disk-usage
To clear the logs use the following command.
$ sudo journalctl --flush --rotate
$ sudo journalctl --vacuum-time=3days
The --flush flag flushes the logs currently in memory onto the disk.
The --rotate flag archives the existing logs so they can’t be written to any more and starts new logs for each service.
The --vacuum-time flag deletes log data that is older than 3 days.
Output should be similar to the screenshot below.
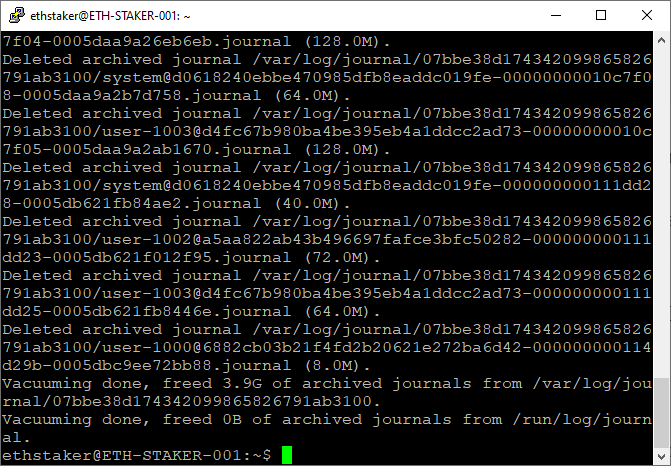
It is recommended to check the logs are in a good state after the vacuum operation.
$ sudo journalctl --verifyEach log should have a status of PASS.
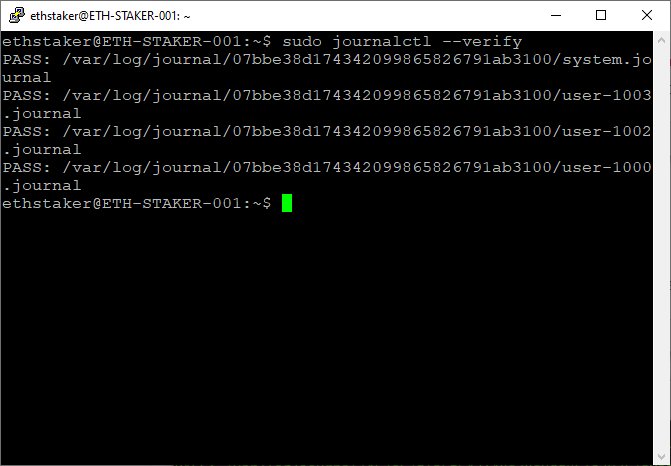
Automatically Limit Log Size
If you would prefer to have the system automatically keep log data to a specified max size complete the following additional steps.
Open the systemd journal service configuration file.
$ sudo nano /etc/systemd/journald.confCarefully edit the file to set the maximum disk space that can be used by the journal in persistent storage. Remove the # from the line SystemMaxUse and add a value in megabytes, say 200M.
Check the screenshot below for reference.
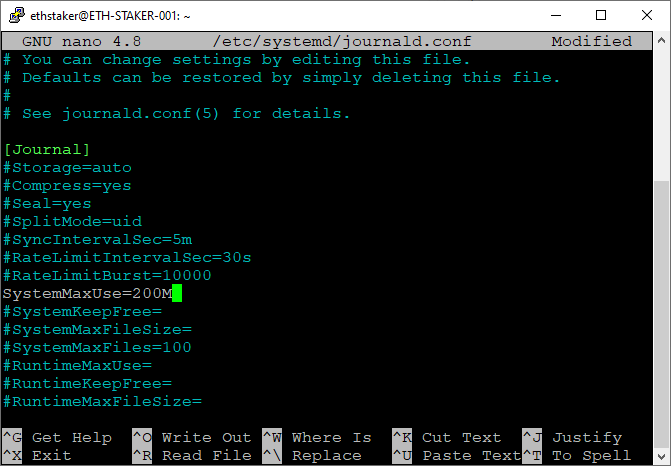
Press <CTRL> + X then Y then <ENTER> to save and exit.
Restart the journald after updating the file.
$ sudo systemctl restart systemd-journaldJournal logs will now be limited to 200MB in size.
Appendix J — Expanding the Logical Volume
There are cases where Ubuntu is provisioning only 200GB of a larger SSD causing users to run out of disk space when syncing their Eth1 node. The error message is similar to:
Fatal: Failed to register the Ethereum service: write /var/lib/goethereum/geth/chaindata/383234.ldb: no space left on device
To address this issue, assuming you have a SSD that is larger than 200GB, expand the space allocation for the LVM by following these steps:
$ sudo lvdisplay # <-- Check your logical volume size
$ sudo lvm
> lvextend -l +100%FREE /dev/ubuntu-vg/ubuntu-lv
> lvextend -l +100%FREE -r /dev/ubuntu-vg/ubuntu-lv
> exit
$ sudo resize2fs /dev/ubuntu-vg/ubuntu-lv
$ df -h # <-- Check results
That should resize your disk to the maximum available space.
If you need support on this please check with the EthStaker Discord.
Full Disclaimer
This article (the guide) is for informational purposes only and does not constitute professional advice. The author does not warrant or guarantee the accuracy, integrity, quality, completeness, currency, or validity of any information in this article. All information herein is provided “as is” without warranty of any kind and is subject to change at any time without notice. The author disclaims all express, implied, and statutory warranties of any kind, including warranties as to accuracy, timeliness, completeness, or fitness of the information in this article for any particular purpose. The author is not responsible for any direct, indirect, incidental, consequential or any other damages arising out of or in connection with the use of this article or in reliance on the information available on this article. This includes any personal injury, business interruption, loss of use, lost data, lost profits, or any other pecuniary loss, whether in an action of contract, negligence, or other misuse, even if the author has been informed of the possibility.
